Drupal2Jekyll
When I first released the new update of my site, I mentioned the tool that I built to help convert my Drupal site to a Jekyll format. Well, after getting sidetracked by all the other posts I had to write about the stuff we're doing in TripleFun, I finally got around to cleaning the tool up a bit for public release. Presenting Drupal2Jekyll!
A little caveat
This post probably isn't going to be super relevant for a lot of people. For one, you need to have a Drupal site. Next, it needs to be a Drupal 6 site. I've no idea if it works in Drupal 7, I haven't tested it (generally it should only be a case of writing/modifying the parsers). After that, you need to have phpMyAdmin access, as you need to download the different tables in XML format, as that's the easiest way I could do it (I could probably just connect directly to the DB, but I had other concerns, so I never really looked into it). Lastly, you need to want to move to Jekyll, which if you don't know it, is a static-site generator.
If you tick all those boxes, or despite everything, are still curious, then read on!
What it does
Drupal2Jekyll is an AIR tool that parses Drupal XML files to extract the content, clean it up, modify it, then save it in Jekyll format. Nearly all the different Controllers are optional, so you can toggle what you wish to get the desired effect.
I'm also assuming that you want to embrace the Jekyll URL format, so you'll ditch your old URLs (the tool can generate 301/302 redirects for you, so you won't be trailing dead links behind you - Don't Break the Web™).
All Controllers affect both post content and comments, so in no particular order, the tool:
- Performs some simple HTML validation on your content, such as making sure it's wrapped in
<p>tags (Drupal has a simple input format where you're not actually obligated to write HTML, which obviously doesn't work now that we're static) - Makes all
<code>tags HTML compliant.<pre>tags have inner<code>tags, and<code>tags now have a proper class property. This makes it easy to use JS syntax highlighters like Prism - If you'd prefer Jekyll's in-built highlighter (quicker for the end user), then all
<pre><code>tags will be changed to{% highlight %}liquid tags - You can replace all relative links with absolute ones. I do this as it means that links in my RSS feed resolve properly
- Verifies all URLs to see if they're still valid or not. It only does this with absolute URLs, so if you want to test internal ones, you need to replace them. This
Controllergenerates a txt file where you can supply replacements if necessary. This assumes that URLs return a valid 200 code, which isn't the case for everything - Replaces all dead links if a new link was supplied in the txt file generated by the
VerifyLinkController - Marks any remaining dead links with a CSS class, so you can change their appearance visually, or target them with JS
- Replaces all old internal URLs with their new Jekyll format (so you don't go through a needless redirect)
- Replaces any references to your site URL with Jekyll
site.baseurl/site.url - Lists all CSS classes actually used from your old site CSS file, as you're probably updating your site at the same time. This helps remove old CSS cruft that might be present
- Lists all CSS IDs using in your old site CSS file, for the same reason
- Lists any files associated with, or linked to, your pages. This lets you remove any files that aren't used anymore
- Lists any pages that have PHP code, so you can change the filetype afterwards (or do what I did and replace pretty much everything with JS)
- Prints out HTML code for your Drupal menus, so you can use it as is in your new Jekyll templates
- Generates 301 permanent (or 302 temporary) redirects for all your pages, so links to your old Drupal formatted URLs will now go to your new Jekyll formatted ones. This works for both normal and pretty URLs and any terms you've added
- Generates PHP code to push your content to TapirGo, which is the easiest way to add search to your static site that I've found. Tapir pulls content automatically from your RSS feed, but it's limited to how many posts you currently have in your RSS. Liquid tags, HTML tags, and whitespace are removed from your content, so only the bare text is pushed, which makes it easier to manipulate if you want to display search snippets in results returned from Tapir
- 404, archive, contact, search, and tags pages are also generated for convenience. The archive and tags pages are in pure liquid, so they'll automatically update everytime you generate your site. The 404 page will break up the wrong URL entered into search terms, which is great for users. The search page will pull content from Tapir and display a few snippets of text for the searched terms. Contact will send an email whenever someone fills in the form. The different JS files are included in the archive
Obviously, you'll need to give the final result a quick once over, but it does a lot of the grunt work and will generally make it a lot less painful that it needs to be.
How to use the tool
First download and build the code, or run the AIR file included at the end of the post. Once it's installed, when you run it, it'll ask you for a few things before you get started.

- Drupal XML folder: The folder that you've saved the XML files download from phpMyAdmin. This is your content recovered from Drupal (see later)
- Site URL: The url of your site (no way!)
- Site files folder name: The name of the folder where your images etc are stored. The Drupal default is files, so it's probably that
- Site CSS file: The CSS file that you used in your Drupal site, so the
ListClassesControllerandListIDsControllercan work - Dead link folder: The folder where we'll save the text file generated by the
VerifyLinkController. You can edit this text file to provide replacements for theReplaceDeadLinkControllerand to avoid running theVerifyLinkControlleragain (it takes a long time, and helps if you want theMarkDeadLinkControllerto do its thing without waiting half an hour beforehand) - Jekyll folder: The folder to save our output to (i.e. where you're going to run
jekyll buildin order to build your Jekyll site). All the relevant subfolders will be generated - Default <code> type: If you're using the
CodeControllerto make your<pre>and<code>tags HTML5 compliant, this is the class added to<code>if it doesn't already have one - Jekyll <code> type: If you're using the
JekyllCodeControllerto turn your<pre><code>code into{% highlight %}liquid tags, this is the language that the Jekyll code highlighter will use to determine what's what when generating the HTML - Quote type: Whether you use " or ' when using quotes. If you're unsure or you don't care, just use "
- URLs to treat as pages, not posts: I define 2 types of pages for your site: pages and posts. Posts can have comments (applied through my layout, so this may not apply to you), and have the Jekyll URL format, while pages are generally "date-free" and what you'd use for pages like "about" or "contact". Their URLs won't be changed
- TapirGo secret token: When you sign up for TapirGo, you're given a secret token that, amongst other things, allows you to push content to their service. This is used by the
TapirPushControllerwhen generating the PHP code for pushing your site content
Once you've all that set up, we'll need the actual content.
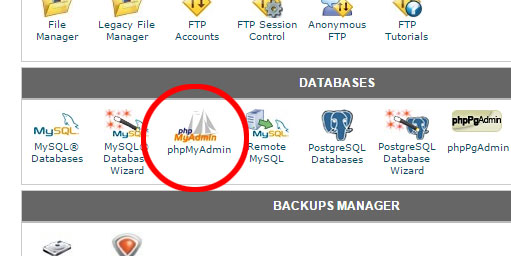
First, log into your phpMyAdmin. You'll be able to get into this through the cPanel on your hosting site:

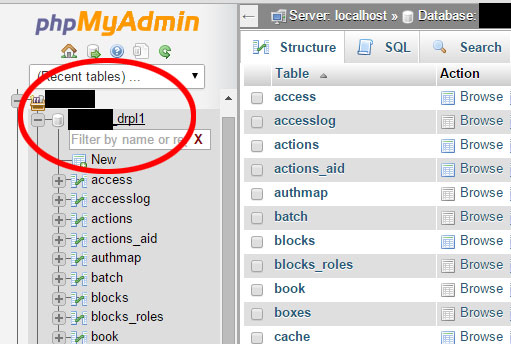
Next, select the database that you use for your drupal site. You'll probably only have one:

Once here, we need to download the right tables to XML format. The tables to download are:
- comments - holds all the comments for your site
- files - holds the details on all the files uploaded
- menu_links - holds the menus that you've saved
- node - holds the details of all your pages
- node_revisions - holds the actual content of your pages
- opengraph_meta - if you have the OpenGraph plugin that automatically creates OpenGraph tags for your pages
- term_data - holds the terms that you've added
- term_node - holds the links between the terms added and the nodes they were added to
- upload - holds the links between the files uploaded and the nodes they were uploaded to
- url_alias - holds the custom urls that you've given to your pages
The only absolute necessary ones are node and node_revisions. The rest are bonus.
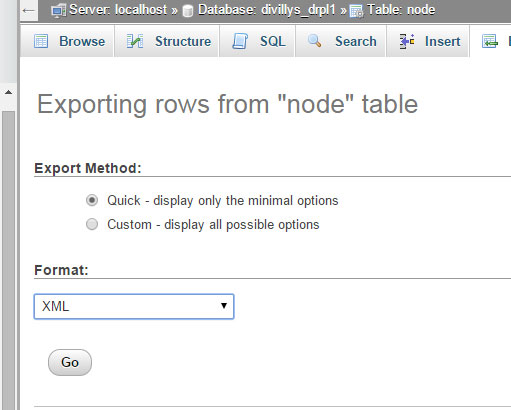
To export a table, click on the one in question, for example, node, and along the top, click on the Export tab:

You can leave the Quick option selected, then just select XML as the file format, and hit Go to download the XML:

Do this for all the necessary tables, and save them to your Drupal XML folder. You're now ready to rock.
Getting the tool
The code lives online at https://bitbucket.org/divillysausages/drupal2jekyll, but if you just want the AIR file, and JS files, they're included at the end of the post.
Comments and questions are appreciated. Enjoy!
Comments
Submit a comment