Colony tech update 1: Creating a game camera, part 6, following objects
Probably one of the more interesting controllers; controlling the camera by following objects. Or creeping, as we like to call it.
In its most simple form, we store an object that we want to follow on the controller, then every frame, update the camera's position to match it. As an added bonus, to make the camera jump to another object's position, you only need to change the follow object.
While technically we could stop there, to make things more visually interesting, and to make it look as if we're good at our jobs, we want to animate the camera to its final position.
If the object that you're following is static, you could just simply tween the camera there, but then again, if you're following static objects, that's just a waste of good code. As our objects will be moving, we can't really use a tween, as the final position will be changing continuously. Thus we use our friends, lerp() or damp().
Lerping
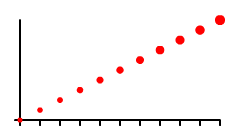
lerp(), not to be confused with herp() or derp(), stands for linear interpolation; simply going from one value to another. In graph form, it looks a little like this:

In code form, it's equally simple:
public static function lerp( start:Number, end:Number, factor:Number ):Number
{
	return end * factor + ( 1 - factor ) * start;
}
factor here is a Number between 0.0 and 1.0. If it's 0.0, then we stick to the start value, while 1.0 will return the end.
Damping
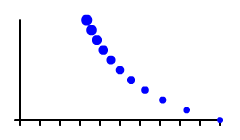
damp(), on the other hand, is a little more complex, but gives better results visually. It lets us smoothly arrive at our destination point, slowing as we get nearer. It stands for dat's almost my point, and looks a bit like this in graph form:

Code wise, it shapes up like this:
public static function damp( source:Number, dest:Number, dt:Number, factor:Number, precision:Number ):Number
{
	if ( Math.abs( source - dest ) < precision )
		return source;
	return ( ( source * factor ) + ( dest * dt ) ) / ( factor + dt );
}
dt is normally the delta time of your game, but you can modify it to get a better curve (you can play with MainLerpDamp.as to see the effects of different values). factor is similar as in lerp(), though in the opposite direction; 0.0 is the end, while 1.0 is the start (read the graph from right to left to make sense of it). You're not strictly limited to a max of 1.0; again you can play with the values to see the results.
Offsetting
Another trick we can pull with the follow camera, is applying an offset. For this code sample, I've implemented 3 forms of offset:
- Basic, or static offset
- An offset modified by the object's rotation
- An offset modified by the object's position delta (or how much it's moving)
Which one you want to use depends on what your camera is following. If you're doing a top-down shooter where you control a soldier, then you probably want the offset to be based on his rotation - that way you have the most optimum view of the arena in front of him, even when he's moving backwards. If you're doing a side-scroller, or a space game (cough), then you probably want it to be based on your object's change in position; i.e. the faster you move, the more the camera is offset in the direction you're travelling, giving you a better vision of where you're going.
P.S.
The other controllers make use of an "active" Signal so we know when they're active or not. As CameraFollowControls is active as long as it has an object to follow, if you're going to use it with another controller, you can either set the follow object to null, or set active to false when you detect another controller activating.
The code
You can download it below, along with the other classes. Keep scrolling for a live example.
package
{
	import flash.display.DisplayObject;
	import flash.display.Stage;
	import flash.geom.Point;

	/**
	 * Controls a camera by following an object
	 * @author Damian Connolly
	 */
	public class CameraFollowControls extends CameraControls
	{

		/*******************************************************************************************/

		/**
		 * The ease type to use when following our object
		 */
		public var followEaseType:CameraFollowEaseType = CameraFollowEaseType.NONE;

		/**
		 * The offset type to use when applying our follow offset
		 */
		public var followOffsetType:CameraFollowOffsetType = CameraFollowOffsetType.NONE;

		/**
		 * The follow factor to add some smoothing between the camera position and the target
		 * position. If we're lerping, then from 0.0 to 1.0 is loose to tight. If damping, then
		 * 0.0 to 1.0 is tight to loose. Generally this number is between 0.0 and 1.0, but with
		 * damping, you can experiment with other values
		 */
		public var followFactor:Number = 0.5;

		/*******************************************************************************************/

		private var m_followObj:DisplayObject	= null;	// the object that we're following
		private var m_offset:Point 				= null; // the offset point for where we're following
		private var m_rotatedOffset:Point		= null;	// the rotated offset point, if we're using rotation
		private var m_prevCameraPos:Point		= null;	// the previous camera position
		private var m_prevObjPos:Point			= null;	// the previous follow object position

		/*******************************************************************************************/

		/**
		 * The object that we're following
		 */
		[Inline] public final function get followObj():DisplayObject { return this.m_followObj; }
		[Inline] public final function set followObj( d:DisplayObject ):void
		{
			this.m_followObj = d;
			if ( this.m_followObj != null )
				this.m_prevObjPos.setTo( this.m_followObj.x, this.m_followObj.y );
		}

		/*******************************************************************************************/

		/**
		 * Creates a new CameraFollowControls object
		 * @param camera The camera that we're controlling
		 * @param stage The main stage
		 * @param followObj The object that we're following
		 */
		public function CameraFollowControls( camera:Camera, stage:Stage, followObj:DisplayObject = null )
		{
			super( camera, stage );
			this.m_offset			= new Point; // anchor point
			this.m_rotatedOffset	= new Point; // if we're using rotation
			this.m_prevCameraPos	= new Point;
			this.m_prevObjPos		= new Point;
			this.followObj 			= followObj; // NOTE: use the setter
		}

		/**
		 * Destroys the CameraFollowControls and clears it for garbage collection
		 */
		override public function destroy():void
		{
			super.destroy();
			this.followEaseType		= null;
			this.followOffsetType	= null;
			this.m_followObj		= null;
			this.m_offset			= null;
			this.m_rotatedOffset	= null;
			this.m_prevCameraPos	= null;
			this.m_prevObjPos		= null;
		}

		/**
		 * Sets the offset point, or the offset that we'll apply when following our object
		 * @param ox The offset x position
		 * @param oy The offset y position
		 * @param offsetType The CameraFollowOffsetType to use when applying this. If null, then
		 * CameraFollowOffsetType.NONE is used
		 */
		public function setOffsetPoint( ox:Number, oy:Number, offsetType:CameraFollowOffsetType = null ):void
		{
			this.m_offset.setTo( ox, oy );
			this.followOffsetType = ( offsetType == null ) ? CameraFollowOffsetType.NONE : offsetType;
		}

		/**
		 * Updates the CameraFollowControls every frame it's active
		 * @param dt The delta time since the last call to update
		 */
		override public function update( dt:Number ):void
		{
			// if we don't have a follow object, do nothing
			if ( this.m_followObj == null )
				return;

			// get our camera position based on our object and offset
			// NOTE: we're not using global position as the camera will probably move the layer that the object
			// is on, so it'll get screwed up
			var tx:Number = this.m_followObj.x;
			var ty:Number = this.m_followObj.y;

			// apply our offset type
			if ( this.followOffsetType == CameraFollowOffsetType.NONE )
			{
				// just add the offset
				tx += this.m_offset.x;
				ty += this.m_offset.y;
			}
			else if ( this.followOffsetType == CameraFollowOffsetType.OBJ_ROTATION )
			{
				// our offset is based on our object's rotation
				MathHelper.rotate( this.m_offset, MathHelper.degreesToRadians( this.m_followObj.rotation ), this.m_rotatedOffset );
				tx += this.m_rotatedOffset.x;
				ty += this.m_rotatedOffset.y;
			}
			else // CameraFollowOffsetType.OBJ_POS_DELTA
			{
				// rotate our offset
				var radians:Number = MathHelper.radianAngle( this.followObj.x - this.m_prevObjPos.x, this.followObj.y - this.m_prevObjPos.y );
				MathHelper.rotate( this.m_offset, radians, this.m_rotatedOffset );

				// multiply our offset by our delta position
				var posDelta:Number = MathHelper.dist( this.m_prevObjPos.x, this.m_prevObjPos.y, this.followObj.x, this.followObj.y );
				tx 					+= this.m_rotatedOffset.x * posDelta;
				ty 					+= this.m_rotatedOffset.y * posDelta;
			}

			// interpolate to the position. NOTE: CameraFollowEaseType.NONE is already taken
			// care of
			if ( this.followEaseType == CameraFollowEaseType.DAMP )
			{
				tx = MathHelper.damp( this.m_camera.cameraX, tx, dt, this.followFactor, 1.0 );
				ty = MathHelper.damp( this.m_camera.cameraY, ty, dt, this.followFactor, 1.0 );
			}
			else if ( this.followEaseType == CameraFollowEaseType.LERP )
			{
				tx = MathHelper.lerp( this.m_camera.cameraX, tx, this.followFactor );
				ty = MathHelper.lerp( this.m_camera.cameraY, ty, this.followFactor );
			}

			// move the camera (only if we've moved)
			if ( this.m_prevCameraPos.x != tx || this.m_prevCameraPos.y != ty )
			{
				this.m_camera.moveCameraTo( tx, ty );
				this.m_prevCameraPos.setTo( tx, ty );
			}

			// update our previous object position
			this.m_prevObjPos.setTo( this.m_followObj.x, this.m_followObj.y );
		}

	}

}
Example
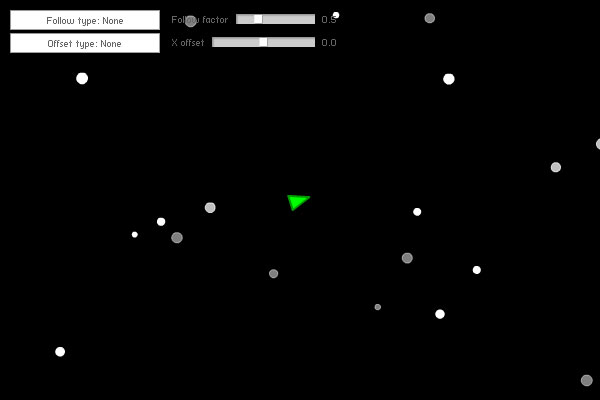
The code in action; click on the stage to give it focus, then click and hold the mouse to move the ship. The GUI on the top left will let you switch between the different modes of following an object, as well as the different offset types.

Colony mailing list
Plug for the Colony mailing list:
Comments
Greetings and a lot of strength from Czech R. ;)
hope you are fine, master ! :D
Submit a comment