Using Phaser with Visual Studio Code
With all my main writing tasks completed, I've been looking to expand my horizon a bit, and one project I've had my eye on for a while is Phaser, a desktop and mobile HTML5 game framework.
HTML5 games have been on my bucket list for ages, but I've held off until it was more mature, there was better tooling support, and smarter people than me figured out all the stingers. Phaser is created by Photon Storm, who've been working in HTML5 games for a long time, and along with others, have poured countless hours into creating the most starred JavaScript game framework on GitHub.
Seems good enough for me.
Enter TypeScript and Visual Studio Code
While you could write pure JS, much in the same way as you could eat your dinner by having someone throw it at your face from across the room, a more sensible approach is to using something like TypeScript, a Microsoft-developed superset of JavaScript that compiles down to pure JS. The syntax is extremely familar if you're coming from something like ActionScript, so while it has some flaws, it's a great choice.
Added to that, Microsoft have also released Visual Studio Code, a free, cross-platform IDE, specifically geared towards ASP.NET and NodeJS. Visual Studio Code also supports TypeScript, and did I mention that it's free?
It's still under heavy development, but if there's one thing Microsoft do well, it's developer tools.
Setting up Phaser, TypeScript, and Visual Studio Code
I didn't see much info on getting all these to play nice, so this is a quick step-by-step guide on getting a development environment up and running.
As of writing this, I'm running Visual Studio Code 0.3.0, Phaser 2.3.0, TypeScript 1.5.0-beta (the necessary version for VSC), and NodeJS 0.12.4. Later versions might require different steps. I'll also say, that I'm not an expert in at least 3 of these, so there might be easier ways to do things. *Might*.
Installing everything
First up, actually installing everything you'll need for this, i.e. getting Visual Studio Code, NodeJS, TypeScript, and Phaser from the internet and onto your computer.
- Visual Studio Code: Head here and download the latest version. Easy
- NodeJS: Head here and download the latest version. Also easy
- Phaser: You can download Phaser here, but a better way would be to go through Git. Use something like SourceTree, then clone this url: https://github.com/photonstorm/phaser.git. Not familiar with Git?
- TypeScript: When you downloaded NodeJS, you also got npm, the NodeJS Package Manager. This is the easiest way to download node packages, TypeScript included. Open a command line window or bash shell and type:
npm install -g typescript
NOTE: As was pointed out in the comments, you need to be running at least TypeScript 1.5.0-beta. I mentioned this above, but 1.4 etc won't work with VSC.
NOTE: Another from the comments; if you're running Windows 8 and you're getting a node-static not found error, try running VSC once as admin (right-click on the icon, and select Run as administrator).
Once everything is installed, you're ready to rock.
Creating your TypeScript project
For Visual Studio Code, a TypeScript project is a folder where a tsconfig.json file, their equivalent of a project file, can be found.
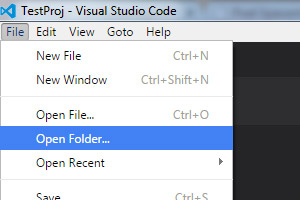
Click File > Open Folder. You can create a new one if you want.
For the purposes of this tutorial, and polluting my folders, I've used the name MyProj.
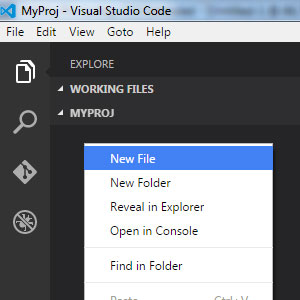
Next up, right-click, select New File and name it tsconfig.json.
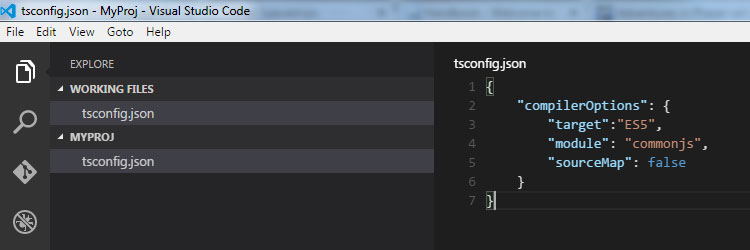
The great thing about Visual Studio Code is that it recognises this type of file immediately, so you get auto completion even though it's a simple JSON file. Fill it out with the following code:
{
	"compilerOptions": {
		"target": "ES5",
		"module": "commonjs",
		"sourceMap": false
	}
}
For now, the details aren't too important, but if you want more info on what goes into a tsconfig.json file, you can get it here. The only thing I would say, is set sourceMap to true if you want to generate sourcemaps for your compiled JS, which lets you debug it using the original TypeScript code.
NOTE: Based on a comment from Jonas below, if you're using TS 1.8 and above, only amd and system support the --out parameter in the tasks file, so you'll either need to change how you build, or use one of the other two.
Adding Phaser to the project
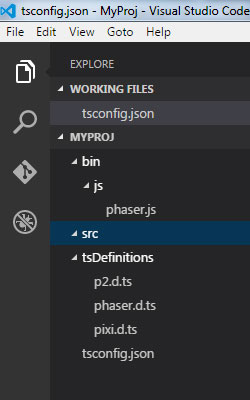
To add Phaser to your project, you'll need 4 files minimum, which you'll find wherever you downloaded Phaser to:
- phaser.js (or phaser.min.js for production) - found in the build/ folder
- p2.d.ts - found in the typescript/ folder
- phaser.d.ts - found in the typescript/ folder
- pixi.d.ts - found in the typescript/ folder
The first one is so that you can actually play your game, while the last 3 are TypeScript definition files, for P2 physics, Phaser, and PixiJS respectively, and are necessary if you want to have code completion in your project (the answer to this is "yes").
How you set up your project is up to you, but I put the phaser.js file in the bin/js/ folder, and the TypeScript definition files in the tsDefinitions/ folder. The bin/ folder is essentially what you're going to upload to your server, so all game files and assets need to be here.
Creating your simple game
I followed this basic "How to use Phaser with TypeScript" tutorial to get the code for this, but all we're going to do is create a simple state that displays our logo on the screen.
The image I'm using, ds_logo.png, is my basic game logo, but you can use whatever you want. I've placed it in the bin/assets/ folder.
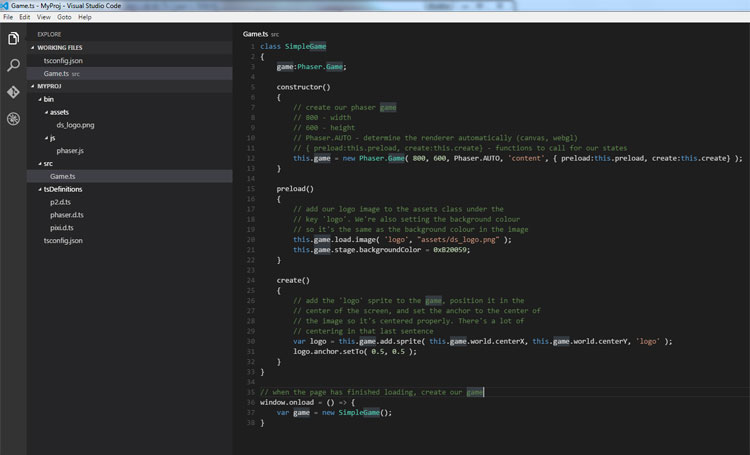
The code for your SimpleGame, saved as Game.ts in the src/ folder is:
class SimpleGame
{
	game:Phaser.Game;

	constructor()
	{
		// create our phaser game
		// 800 - width
		// 600 - height
		// Phaser.AUTO - determine the renderer automatically (canvas, webgl)
		// 'content' - the name of the container to add our game to
		// { preload:this.preload, create:this.create} - functions to call for our states
		this.game = new Phaser.Game( 800, 600, Phaser.AUTO, 'content', { preload:this.preload, create:this.create} );
	}

	preload()
	{
		// add our logo image to the assets class under the
		// key 'logo'. We're also setting the background colour
		// so it's the same as the background colour in the image
		this.game.load.image( 'logo', "assets/ds_logo.png" );
		this.game.stage.backgroundColor = 0xB20059;
	}

	create()
	{
		// add the 'logo' sprite to the game, position it in the
		// center of the screen, and set the anchor to the center of
		// the image so it's centered properly. There's a lot of
		// centering in that last sentence
		var logo = this.game.add.sprite( this.game.world.centerX, this.game.world.centerY, 'logo' );
		logo.anchor.setTo( 0.5, 0.5 );
	}
}

// when the page has finished loading, create our game
window.onload = () => {
	var game = new SimpleGame();
}
If VSC is giving you any gyp about Phaser being an unrecognised variable, or you don't have code completion when you type, add:
/// <reference path="../tsDefinitions/phaser.d.ts" />to the head of the file. This is the TypeScript equivalent of the import statement. Note that we're importing the TypeScript definition file (or source map, if you will), not the phaser.js code file itself.
We also need to create a simple HTML file that will actually display our game. The following is index.html, saved in the bin/ folder:
<!DOCTYPE html>
<html>
	<head>
		<title>Simple game</title>
		<script src="js/phaser.js"></script>
		<script src="js/game.js"></script>
	</head>
	<body>
		<h1>Simple game</h1>
		<div id="content"></div>
	</body>
</html>
The only thing we're doing is adding the js/phaser.js file, and the js/game.js file, and creating a div element named content (the same name we passed to the new Phaser.Game(...) call).
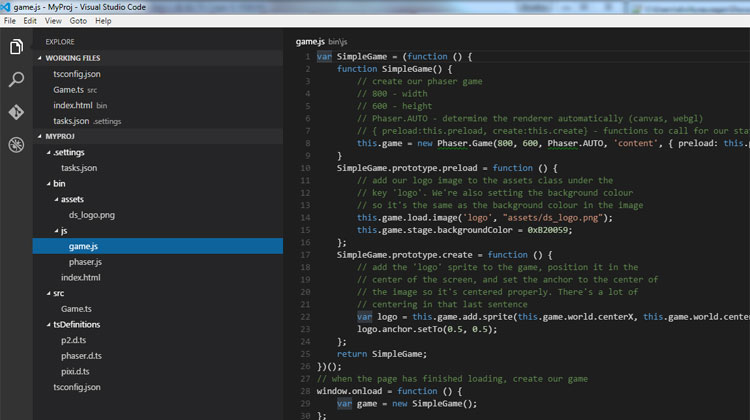
js/game.js doesn't actually exist yet, through, because we haven't compiled our SimpleGame TypeScript class down to pure JS. Let's do that now.
Building our project
By default, TypeScript will take one ts file and produce one js file. As it would get old *really* quickly to add all the JS files of any decent size project to the page (not to mention organising them in order of dependancies, and all the extra round-trips to the server), we can optionally compile everything down to one file (hint: game.js).
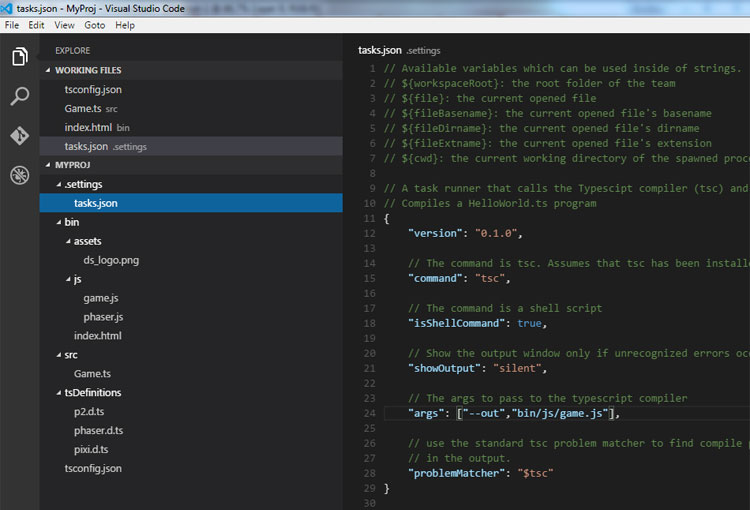
The default shortcut key for building in Visual Studio Code is Ctrl+Shift+B. The first time you press this, you'll see a message on the top of the screen along the lines of "No task runner configured", with a button, "Configure task". That's a button you'll want to press. (NOTE: as pointed out by Crummy in the comments, depending on your version of VSC, you might need to select "Other" > Configure task runner after pressing Ctrl+Shift+B)
VSC will now spit out a tasks.json file and save it in a .settings/ folder. This file is how the TypeScript compiler knows how to behave. There'll be lots of tasks commented out depending on if you're using "gulp" or "jake" or whatever's the flavour of the month of whatever that is, but you're only interested in the first one. Set it to something like this:
// Compiles a TypeScript program
{
	"version": "0.1.0",

	// The command is tsc. Assumes that tsc has been installed using npm install -g typescript
	"command": "tsc",

	// The command is a shell script
	"isShellCommand": true,

	// Show the output window only if unrecognized errors occur.
	"showOutput": "silent",

	// The args to pass to the typescript compiler
	"args": ["--out","bin/js/game.js"],

	// use the standard tsc problem matcher to find compile problems
	// in the output.
	"problemMatcher": "$tsc"
}
The important line is the "args": ["--out","bin/js/game.js"] one. This is telling TypeScript to compile all our ts files into one js file, and save it as game.js in the bin/js/ folder.
After you've created your tasks.json file, hit Ctrl+Shift+B again, and watch the spinny thing down in the bottom left do its thing. When it's done, it'll spit out a game.js file full of pure JS. 'Tis magic so it is.
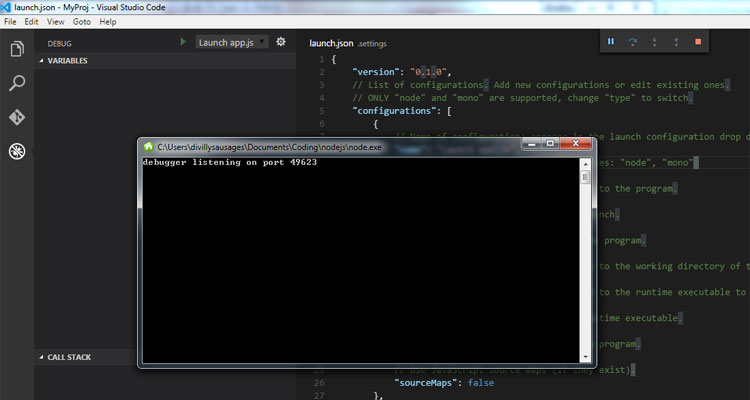
Launching your game
To actually see your game in action, you'll need a local web server. Because of browser security restrictions, you'll want to be loading all your files from the web sandbox, rather than the file sandbox (which is what happens if you just open bin/index.html in a browser). There are multiple ways to get a local server running, including EasyPHP, WAMP, MAMP, or NodeJS. Pick your poison as you wish, but as Visual Studio Code is built with NodeJS support out of the bag, I'll use that one.
The shortcut for launching is F5, so you go ahead and press that.
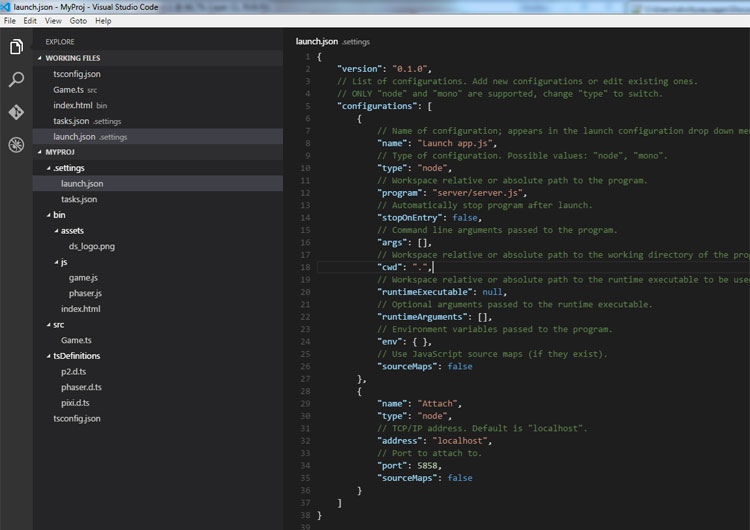
Visual Studio Code has now created a launch.json file for you in the .settings/ folder:

The launch.json file is how you tell it what to actually run, and we're going to tell it to run our NodeJS server. With that in mind, change
"program": "app.js"to:
"program": "server/server.js"and
"stopOnEntry": trueto:
"stopOnEntry": falseSetting stopOnEntry to false just means that we won't pause execution of the app as soon as it's launched (which you might want to do if you're debugging).
server/server.js doesn't actually exist yet, so lets create that now.
Installing node-static
sever.js is going to be our simple server, and is how we serve our files (all the JS, images, music, and HTML files in your bin/ folder). The easiest way to create a file server with NodeJS is with something like node-static.
We're going to use npm to download node-static, so open a command line window or bash shell and type:
npm install -g node-staticThe -g tells npm to install node-static globally, meaning that it's not linked to any one particular project.
NOTE: if you want to make life easier for yourself, just install node-static locally rather than globally and you won't have to go through the following rigmarole. The only reason I install it globally is because I tend to use it in all my projects. To install node-static locally, use npm install node-static instead.
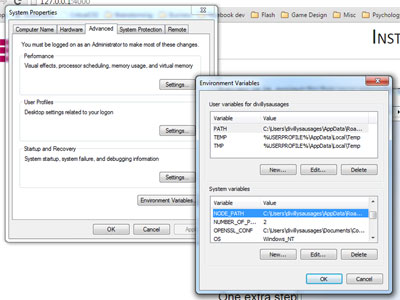
If you install it globally, one extra step we need to do after this is add an environment variable so that when you reference it in a require() call, NodeJS will look in the global folder (why it doesn't do this by default, I don't know).
If you're on Windows, open a folder, right-click on your Computer and select Properties. Select Advanced system settings, then Environment Variables, then under System Variables, add a new one with NODE_PATH as the key, and the path to your global installs folder as the value. If you've left it as the default, then it's C:\Users\USER\AppData\Roaming\npm\node_modules.
NOTE: Opotonil points out in the comments a way to run node-static as a cli, which may be easier.
Creating our server.js file
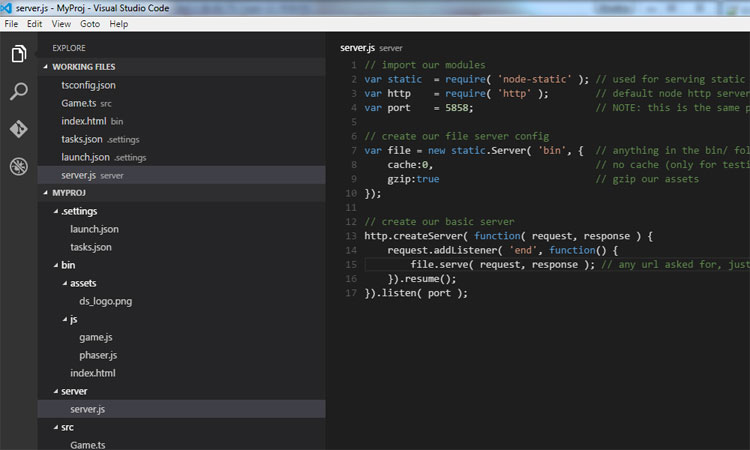
We're just going to create a basic NodeJS server which uses node-static to serve our files. Create a new file called server.js and save it in the server/ folder. Copy this text:
// import our modules
var nodeStatic 	= require( 'node-static' );	// used for serving static files
var http		= require( 'http' );		// default node http server
var port		= 5858;						// NOTE: this is the same port as specified in launch.json

// create our file server config
var file = new nodeStatic.Server( 'bin', { 	// anything in the bin/ folder is served
	cache:0,								// no cache (only for testing)
	gzip:true								// gzip our assets
});

// create our basic server
http.createServer( function( request, response ) {
	request.addListener( 'end', function() {
		file.serve( request, response ); // any url asked for, just try and serve the file from bin/
	}).resume();
}).listen( port );
The only things to note here are that the port is set the same as in launch.json, and that we're setting the bin/ folder as the folder to serve our files out of. We've also set the cache to 0 so that we don't have any problems with cached files when testing our games.
Now when we hit F5 again to launch our game, it should create our node app. If it doesn't go to the Debug view (the bug button) and make sure your configuration is selected.
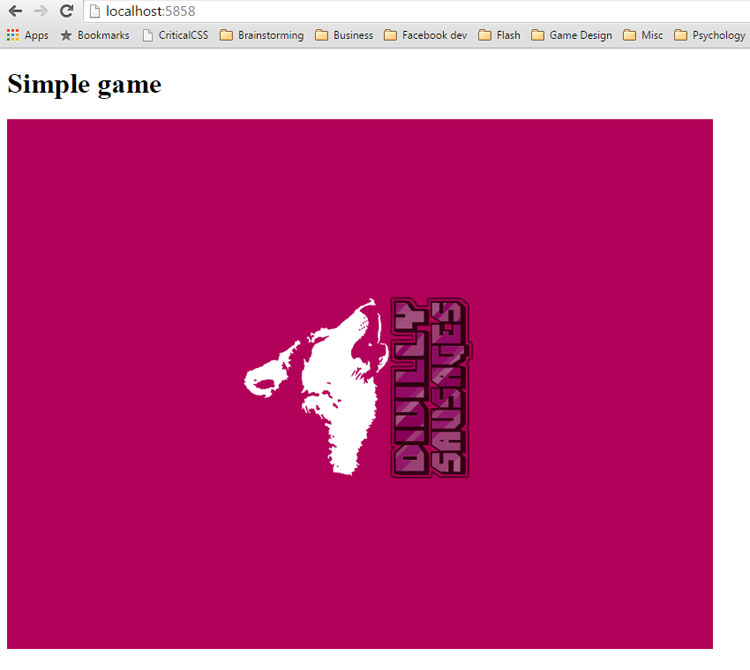
Checking out our game!
Now we can just open up a brower and hit the localhost:5858 url (or 127.0.0.1:5858 if that doesn't work), and we should see our game!
You're now ready to rock with Phaser development!
How can this be made better?
You may have noticed that launching the app wasn't exactly the easiest thing in the world. Coupled with the fact that when your app is running, you can't actually change any source files, it's not an ideal setup.
The only important thing is to build (Ctrl+Shift+B) your TypeScript files to JavaScript - if you have a local web server constantly running in the background, it's probably better than launching one every time you want to test.
Thus, an even easier solution would be to download http-server, which is a stand-alone command line file server. You can launch it by opening a command window and typing:
http-server PATH_TO_PROJECT_FOLDER/binwhich is easily turned into a bat/bash executable file that you can just double-click to run, rather than having to type it every time.
Another point of contention is TypeScripts import code:
/// <reference path="../tsDefinitions/phaser.d.ts" />I'm not sure I could have come up with a more awkward way of doing it. In a comment? Sure, why not. But XML? Ugh, horrible to type. I need to find a shortcut to automatically add it, because you'll probably find yourself adding it multiple times to every file once your projects start to get a bit bigger.
Another small tweak I made was to add some shortcut keys to make VSC behave a bit more like FlashDevelop. You can get this through File > Preferences > Keyboard Shortcuts. I've added:
[
	{ "key": "ctrl+d",			"command": "editor.action.copyLinesDownAction",
									"when": "editorTextFocus" },
	{ "key": "ctrl+q",			"command": "editor.action.commentLine",
									"when": "editorTextFocus" },
	{ "key": "ctrl+shift+q",	"command": "editor.action.blockComment",
									"when": "editorTextFocus" },
	{ "key": "f4",				"command": "editor.action.goToDeclaration",
									"when": "editorTextFocus" }
]
Which is:
- Ctrl+D to duplicate lines
- Ctrl+Q to toggle comments
- Ctrl+Shift+Q to toggle block comments
- F4 to go to the declaration of the object
Also, in the comments, telecoda has mentionned using the vscode-chrome-debug plugin from Microsoft which lets you debug your code directly in VSCode.
Attached below is the MyProj project folder, containing everything I went over here. Go ahead. Download it. Do it.
Comments
This tutorial works like a charm for me, a first time VS Code and Phaser user. Thanks a lot for writing this!
I've got a problem with the tasks file. When I press the Ctrl+Shift+B, it doesn't create the "game.js" file. I've also tried using your project and it doesn't work. Can you please help me?
Hi Alessandro, the first time you press Ctrl+Shift+B, you should be a little tooltip message at the top of the screen (it's easy to miss), with a message along the lines of No task runner configured. Hit the Configure task button, and VSC should create a tasks.json file in your .settings/ folder. Do you have this file? If yes, then:
If it's still not working, send me your email, and I'll take a look at your project.
Yes, I have the tasks.json file
VSC doesn't create any .js file.
There aren't any Error or Warning
Alessandro Lioi i had the same problem. Removed "C:\Program Files (x86)\Microsoft SDKs\TypeScript\1.0\;" from the system's PATH and reinstalled typescript and then it worked
Works on mac only after installing the beta (not 1.4)
fixes the javascript file not compiling as well as not showing any errors at all.
Not just Mac :) After a back and forth on Twitter, the problem was finally resolved, as Alessandro had TypeScript 1.4.1.0 installed. Updating to 1.5.0-beta did the trick.
Awesome tutorial! The only issue I ran into was that I had to run Code as an admin on my Windows 8 machine otherwise I got a 'node-static not found' error - but then AFTER I ran it once as admin it worked on my normal account ... weird.
One other thing I didn't like about code is every time I start debugging it, it pauses at the first line of server.js even if there is not a breakpoint there! 'Paused on entry' it says in the Call Stack. It's super annoying!
Thanks! The reason why it's probably pausing on the first line of server.js could be that you've left
"stopOnEntry": truein the launch.json file. It's the default when the file is created, so it's easy to miss. Just change it tofalseand you should be good.I've updated the post with a note about Windows 8.
Hello, I'm getting a static is a reserved word in strict mode error on the server.js
Hi Saran,
The name of the
varthat you use for node-static can be whatever you want. I should have seen the reserved keyword problem, so I've updated the post. You can replacevar staticwithvar nodeStaticandvar file = new static.Serverwithvar file = new nodeStatic.Serverrespectively.I have the node-static module not found and am running on macbook pro.
Hi Saran,
As mentioned, you need to add the
NODE_PATHpath to your environment variables in order to automatically search globally-installed modules. I'm not entirely sure how to do this on a Mac (perhaps to your .bash_profile?)A simpler solution is to just install node-static locally, rather than globally, using
npm install node-static, and it should be fine. The only reason I install this globally is that I tend to use it in all my projects. I've updated the post to mention thisHi,
great tutorial, thanks for sharing. Does debugging in VS Code really work for you? I set up everything according to your tutorial and then set a few break points in game.ts and even in game.js - just to be sure. When I hit F5, the debug pane opens but no breakpoint gets hit. (I also tried to reload the game in the browser, no success either).
I searched a lot and saw a lot of mentions, that VS Code does not support client side debugging for now?
Hi mfeu,
I agree, debugging is a bit awkward, but it is possible! The reason why you can't debug directly from VS Code is that when you launch your program using F5, you're actually launching the server part...which you can debug :)
For the client part, there's a few things you can do:
console.log()calls. There's quite a lot that you can do with just that - https://developer.chrome.com/devtools/docs/console gives a nice overview"sourceMap": truein tsconfig.json)Visual Studio (not the Code version) allows you to launch your project directly in a browser, so hopefully this functionality will make its way over to Code.
I really appreciate your tutorial here. However, I've run into a strange obstacle setting it up.
Visual Studio Code is ignoring changes that I make to my tasks.json file and is behaving as if I left it at its default state. No matter what I change "args" to, the build gives me this error message:
error TS6053: File 'HelloWorld.ts' not found.
I really did save the file after I changed it! (It auto-saves on build anyway.) And I clear the output on every build. I followed your tutorial exactly. Here is my Stack Overflow question on it:
http://stackoverflow.com/questions/35958296/why-is-visual-studio-code-ignoring-my-tasks-json-file
I hope someone somewhere sees something because I'm really stumped on this one. Thanks!
Hi David,
That's a weird one alright, I've not heard of something like that before. It seems like you have an answer on your StackOverflow question, so I guess the re-boot solved it?
Hey I love the article. Thank you so much.
I ran into a problem, that game me this error:
*TS6082: Only 'amd' and 'system' modules are supported alongside --out.*
Doing some google-fu it turns out that in the new TS 1.8 you cannot use the commonjs module in compiler options, but you need to use amd or system instead.
I went ahead and tried with amd and it worked. So that means my tsconfig.json ended up looking like:
json { "compilerOptions": { "target": "es5", "module": "amd", "sourceMap": false } }On VS Code 1.4.0, I had to select "Other" after CTRL+SHIFT+B > Configure task runner to get the tasks.json file.
Good tutorial, thanks.
You too can use node-static as cli:
And integrate in package.json scripts:
{
	...
	"scripts": {
		"watch": "static -p 5858 -c 0 -z www"
	}
	...
}
And on vscode task.json:
{
	"version": "0.1.0",
	"command": "npm",
	"isShellCommand": true,
	"showOutput": "always",
	"suppressTaskName": true,
	"tasks": [{
		"taskName": "watch",
		"args": ["run", "watch"],
		"isWatching": true
	}]
}
And can use launch.json for use the extension Debugger for Chrome.
Great stuff. Worked a treat.
I decided to use the chrome debugger extension: https://github.com/Microsoft/vscode-chrome-debug
Run my app using
python -mSimpleHTTPServer 8080and debug direct from the typescript.Great tutorial, though I have some suggested changes:
-ginstalls for npm modules, as it can make working in teams over Git or similar, annoying as not everything is properly installed then.${workspaceRoot}/node_modules/.bin/gulp, that will make the task run with only a local gulp install.Concerning the reference to phaser.d.ts, in the official readme, they suggest to use `typings` to make phaser typescript definitions available for the compiler. See:
https://github.com/photonstorm/phaser-ce/tree/master/typescript
Thank's for the wonderful tutorial, I've tried phaser for first time and launched the app without error.. thank you so much
This tutorial has helped me get off the ground with Phaser. That said, some notes:
1. Instead of needing to roll a Node.js server, there's an easier alternative: the Live Server plugin. All you have to do to run your game is right-click your index.html file, and select "Open with live server".
2. I struggled to find a way to use the new @typings setup that NPM uses; it seems they've deprecated the typings command entirely.
Submit a comment